 WhatsApp Us Now
I used to think embroidery was just about picking a thread color and hitting the start button. But once I tried to digitize a logo for embroidery, everything changed.
I used to think embroidery was just about picking a thread color and hitting the start button. But once I tried to digitize a logo for embroidery, everything changed.
I had a simple logo — clean lines, bold text, and one graphic. On screen, it looked perfect. But when I had it stitched? It looked… weird. The lines weren’t crisp. The size felt off. It didn’t pop at all. That’s when I found out about embroidery digitizing services USA. And honestly, they saved my design.
What Is Logo Digitizing Really About?
Digitizing a logo isn’t just turning a picture into stitches. It’s about creating a stitch file that tells the embroidery machine how to move — which direction, what length, what density. Before that, I thought the machine just “knew.”
But no. It needs real instructions. That’s where digitizing comes in. Good digitizers understand how fabric moves. They know which parts of a design need tight stitches and which need room to breathe. Without that, even a good design can fall apart.
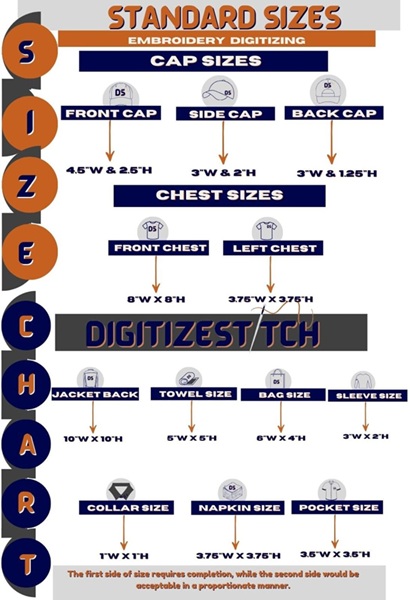
How Size Charts Made Everything Easier
I didn’t even know what an embroidery size chart was until I messed up a few projects. I’d scale my logo up or down without thinking. But guess what? Not every design works at every size.
Small text gets lost. Big images pull the fabric. The embroidery size chart helped me see which sizes worked for left chest logos, hats, patches, even bags. It’s such a simple thing. But it made my process faster — and cleaner. I stopped wasting time and thread. Now I know exactly what size to use before I start.
I Finally Tried 3D Puff Embroidery—And It Worked
I was always curious about 3D puff embroidery. The raised look felt bold and modern. But my first try? Disaster. Turns out, puff embroidery needs special setup. You can’t just use a regular fill stitch and expect it to puff.
When I sent my logo to a team that specialized in 3D puff embroidery, they sent back a version that worked perfectly. The edges were sharp. The foam didn’t peek out. It looked professional. I never could’ve done that myself.
The Secret Weapon: Custom Embroidered Patches
Once I got my logo digitized the right way, I started making custom embroidered patches. Why? Because patches let me use my design anywhere — hats, jackets, bags, uniforms. The cool part? One well-digitized file made dozens of clean patches. I didn’t have to worry about thread pulling or sizing. The patch stayed perfect every time.
And for small businesses like mine, patches are a great way to promote your brand without spending a lot.
How The Right Services Changed My Mind
I used to try to do it all myself. Download a free converter. Upload a logo. Hope it works. But the results were always off. The edges frayed. The stitching looked sloppy.
Once I switched to real embroidery digitizing services USA, I stopped wasting time. I got files that actually worked. I could load them into my machine and get the same clean result every time. That consistency saved my reputation.
Why Bad Digitizing Ruins Good Designs
No matter how cool your logo looks on screen, if it’s not digitized properly, it won’t stitch well. I’ve had text that looked fuzzy. Outlines that didn’t match. And worst of all — logos that looked nothing like the brand.
With help from a professional who knows how to digitize logo for embroidery, my designs finally matched the brand vision I had in my head. That’s powerful.
How I Use Size Charts Before Every Project
Now, I never start a project without checking the embroidery size chart. If it’s a shirt? I know chest logos should be around 3.5 to 4 inches wide. For hats? Stay under 2.25 inches tall. For large back designs? I use stronger backing and adjust the stitch density.
These little decisions save time — and thread. They also keep me from redoing the same piece three times. Seriously, the embroidery size chart is like my cheat code.
What I Wish I Knew Sooner
If I could go back, I’d stop using auto-digitizing software right away. I’d work with pros from the start. I’d understand the impact of stitch type, direction, and pull compensation. I’d use custom embroidered patches more — they’re flexible and make branding way easier.
I’d also have tried 3D puff embroidery sooner. It added personality to my design. It gave it that “wow” effect. And most of all? I’d stop thinking embroidery was just about threads and colors. It’s about planning.
When It All Finally Came Together
Now, my logo looks sharp on polos, stands out on hats, and shines on jackets. People ask where I got them made. That never happened before. It wasn’t magic. It was the right team, using the right file, following the right embroidery size chart.
It took trial and error. But once I found the right embroidery digitizing services USA, it felt easy. No more guesswork. Just results.


