 WhatsApp Us Now
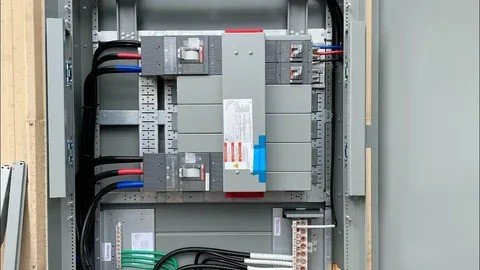
Upgrading or installing a new electrical panel is an essential part of modernizing your home. Proper electrical panel installation ensures your home receives consistent power, prevents hazards, and prepares your system for future electrical needs. Whether you are replacing an old panel or installing a new one, understanding the process can save you time and money.
Why Electrical Panel Installation Matters
A home’s electrical panel controls the flow of electricity throughout the property. Without a properly installed panel, your system could face overloads, frequent breaker trips, or even fire hazards. Modern homes with multiple devices, smart appliances, and electric vehicles need panels capable of handling higher loads. Investing in a quality electrical panel installation ensures safety and efficiency while accommodating future upgrades.
Signs You May Need Electrical Panel Installation
Knowing when to replace or upgrade your panel is crucial. Some common signs include:
- Frequent breaker trips despite low usage
- Flickering or dimming lights when using multiple devices
- Outdated fuse boxes or panels with rust and corrosion
- Insufficient outlets for your electrical needs
- Home renovation or addition requiring more circuits
If you notice these issues, consulting a professional for electrical panel installation can prevent serious problems and improve your home’s energy efficiency.
Types of Electrical Panels
Understanding the types of panels helps you make informed decisions:
1. Main Breaker Panel
This is the most common type in residential homes. It controls all circuits and protects your home from electrical surges.
2. Subpanels
Used to extend the capacity of your main panel, subpanels are ideal for additions, garages, or workshops.
3. Load Center Panel
Smaller than main panels, these are often used for specialized systems or outdoor installations.
Selecting the right panel type is critical for successful electrical panel installation and long-term home safety.
Step-by-Step Electrical Panel Installation Process
1. Planning and Permits
Before beginning, ensure you have the correct permits. Local regulations require inspections and approvals to guarantee safety standards.
2. Power Shutoff
Turn off the main power to prevent accidents during the installation.
3. Panel Removal
If replacing an old panel, carefully disconnect wires and remove the existing box.
4. Mounting the New Panel
Secure the new panel to a stable wall, ensuring it is level and accessible.
5. Wiring the Circuits
Connect each circuit wire to the corresponding breaker. Labeling helps with future troubleshooting.
6. Final Inspection and Testing
Once installed, a licensed electrician will inspect the panel and test all circuits to confirm proper operation.
Hiring experts for electrical panel installation ensures that each step is done safely and efficiently.
Common Mistakes to Avoid During Installation
Even small errors during electrical panel installation can be dangerous:
- Overloading circuits or using wrong breaker sizes
- Poor grounding or missing neutral connections
- Skipping local code requirements or inspections
- DIY installation without proper expertise
Professional services like C9 Electric prevent these issues, offering peace of mind for your home.
Cost Considerations for Electrical Panel Installation
The cost varies depending on your home size, panel type, and complexity. Typical factors include:
- Number of circuits needed
- Main panel amperage capacity
- Labor and permit fees
- Additional upgrades or rewiring
Planning your budget ahead ensures a smooth electrical panel installation without unexpected expenses.
Upgrading vs. Replacing a Panel
Sometimes, your current panel can be upgraded instead of fully replaced. Upgrades might include:
- Increasing amperage capacity
- Adding extra circuits or breakers
- Replacing outdated components
However, if your panel is old, corroded, or unsafe, full replacement is often the better option. Consulting C9 Electric helps determine the right choice for your home.
Safety Tips for Homeowners
- Never touch wires or panels without shutting off power
- Avoid overloading circuits with too many devices
- Regularly check for signs of overheating or rust
- Schedule inspections every few years to maintain safety
Following these safety tips reduces risks while ensuring your electrical panel installation remains effective.
Final Thought
A proper electrical panel installation is essential for home safety, efficiency, and future electrical needs. Understanding the types of panels, planning the installation carefully, and avoiding common mistakes ensures long-term reliability. Trusting professional services like C9 Electric guarantees expert guidance, quality workmanship, and peace of mind. Upgrading your panel today is an investment in your home’s safety and energy efficiency.
FAQs
Q1: How long does electrical panel installation take?
A: Typically, it takes 4–6 hours, depending on panel type and complexity, including inspections.
Q2: Can I install a panel myself?
A: DIY installation is risky. Professionals ensure safety, code compliance, and proper functionality.
Q3: How often should electrical panels be upgraded?
A: Panels usually last 20–30 years, but upgrades may be needed sooner for high-demand homes.
Q4: What is the average cost of a panel installation?
A: Costs range from $1,500 to $3,500 depending on size, location, and labor.
Q5: Will a new panel increase home value?
A: Yes, a properly installed panel improves home safety and resale value.


