
If you’re a cat owner, you’re probably all too familiar with the damage those tiny claws can do to your furniture, walls, and carpets. Cats have a natural instinct to scratch, which helps them keep their claws healthy and sharp, mark their territory, and relieve stress. Instead of trying to stop this behavior, a better solution is to provide your furry friend with a scratching post or pad of their own. One of the most affordable, sustainable, and fun options is a DIY cardboard cat scratcher.
In this comprehensive guide, we’ll walk you through everything you need to know about making your own cardboard cat scratcher at home. Not only will it save you money, but it’s also a great way to recycle old boxes and keep your cat happy and healthy.
Why Choose a DIY Cardboard Cat Scratcher?
There are a few compelling reasons why a homemade cardboard scratcher is a great idea:
- Cost-Effective: Store-bought scratchers can be surprisingly expensive. With DIY, you can create one for free using materials you already have.
- Eco-Friendly: Reusing cardboard helps reduce waste, making this an environmentally friendly choice.
- Customizable: You can make it any size or shape to fit your space and match your cat’s preferences.
- Fun Project: It’s a simple craft project that the whole family can enjoy.
Materials You’ll Need
The beauty of this project is its simplicity. Here’s what you’ll need:
- Lots of cardboard boxes (shipping boxes work great)
- A ruler or measuring tape
- Pencil or marker
- A sharp utility knife or box cutter
- Non-toxic glue or a hot glue gun
- Optional: fabric or wrapping paper for decoration
- Optional: catnip (for added appeal)
Step-by-Step Instructions
Step 1: Gather and Prep the Cardboard
Start by collecting as many cardboard boxes as possible. The more you have, the thicker and more durable your scratcher will be. Make sure the cardboard is clean and free of staples or tape.
Step 2: Measure and Cut
Decide on the size of your scratcher. A common size is about 18 inches long, 6 inches wide, and 4 inches high. Use your ruler to measure and mark strips of cardboard that are 4 inches wide (to match the desired height). Cut along the lines using your utility knife.
You’ll need dozens of these strips depending on how long and wide you want the scratcher. Consistency in width is important for a neat finish.
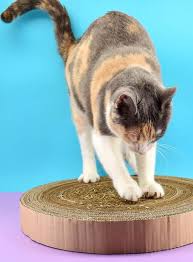
Step 3: Roll or Stack
There are two popular styles of cardboard scratchers: stacked and rolled.
- Stacked Method: Lay the strips flat and glue them together side-by-side. Keep stacking until you reach the desired length.
- Rolled Method: Take one strip, roll it tightly, and glue as you go. Add another strip once the first is done, and continue until you reach your desired diameter.
Both methods work well—choose the one that suits your materials and preference.
Step 4: Glue the Pieces Together
Using non-toxic glue, adhere the strips together. Apply glue generously but neatly to ensure they stick without overflowing. If using hot glue, be careful not to burn yourself.
Allow the glue to dry completely before moving on. You may want to place a heavy object on top to help compress the stack.
Step 5: Optional Decoration
Once your scratcher is dry and sturdy, you can decorate it to blend in with your home. Wrap the sides in fabric, decorative paper, or paint with non-toxic paint. Avoid anything that could be toxic or harmful to your cat.
Step 6: Add Catnip (Optional)
To make your scratcher even more irresistible, sprinkle a little catnip between the layers or on top. Most cats find this hard to resist!
Tips for Success
- Cut Carefully: Use a sharp blade and cut slowly to keep the edges clean and straight.
- Consistency is Key: Make sure each strip is the same width for a uniform look.
- Weight Helps: Place a heavy book on top while the glue dries to keep everything compressed.
- Refill and Reuse: Once the scratcher is worn down, you can glue more strips on top or recycle it and make a new one.
Different Design Ideas
Want to get creative? Here are a few fun variations:
- Inclined Scratcher: Glue the cardboard pieces on a slant to create a ramp.
- Modular Blocks: Create small cubes that can be arranged into different shapes.
- Wall-Mounted Scratcher: Attach your cardboard creation to a board and hang it on the wall.
- Multi-Level Tower: Stack multiple layers to make a climbing and scratching combo.
Why Your Cat Will Love It
Cats are naturally drawn to cardboard because it’s easy to sink their claws into and it provides satisfying resistance. A DIY scratcher gives them a designated place to scratch, stretch, and even nap. Plus, the scent of cardboard is comforting to many cats.
Health and Safety Considerations
Always supervise your cat when introducing a new toy or scratcher. Make sure the materials used are clean and non-toxic. Avoid sharp edges or loose parts that could be swallowed.
If your cat is hesitant at first, try placing the scratcher near their favorite spot or rubbing a little catnip on it.
Final Thoughts
LifeGizmoHub is a rewarding project that benefits both you and your feline friend. It keeps your cat entertained, satisfies their natural instincts, and helps protect your furniture. Plus, it’s a fantastic way to repurpose old cardboard boxes and reduce waste.
If you’re looking for more clever pet DIYs, product recommendations, and tips to upgrade your home for your furry companions, be sure to check out LifeGizmoHub. They offer a wide range of ideas and gadgets designed to make pet parenting easier and more enjoyable!


