 WhatsApp Us Now
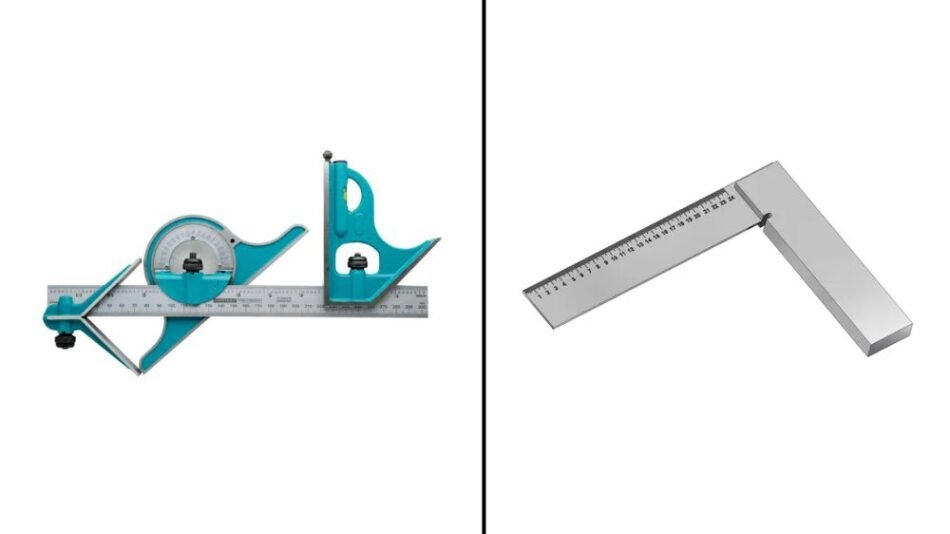
Combination Square and Try Square: Functional Differences
A try square is simply a fixed blade held exactly at 90 degrees to the handle. One important function of the bench is to check for squareness and to mark straight lines across flat stock. The blade is pinned or riveted into the stock, and the fixed design means no moving parts to adjust, keeping the tool rigid and ready to use. A combination square has a blade that slides through an adjustable head that can be loosened and locked anywhere along the blade. The head typically has a flat 90-degree face and a 45-degree angled face to mark certain measurements and angles on a variety of workpieces. A try square offers a good fixed reference point, but the combination square can be moved to meet different layout requirements.
Combination Square vs Try Square: Capability Comparison
The table below outlines how both tools perform across different measurement and marking tasks on the shop floor.
| Capability | Combination Square | Try Square |
| 90° checking | Yes, it relies on a sliding head | Yes, highly rigid fixed head |
| 45° measurement/marking | Yes, built into the head | No |
| Adjustable measurements | Yes, blade slides and locks | No, fixed blade length |
| Depth measurement | Yes, blade acts as depth gauge | No |
| Parallel marking | Yes, by locking head at distance | No |
| Centre finding | Yes, with centre head attachment | No |
| Ease of use | Requires locking and adjustment | Very simple, ready to use |
| Versatility | High, multiple functions | Low, single dedicated function |
Practical Applications and Use Cases
- Machining and metalworking: Machinists use a combination square to check part dimensions directly on a lathe. They also set tooling angles and measure the depth of milled slots during complex metalworking processes.
- Fabrication and layout work: Welders use a try square to set up steel tubing before tacking the joints. The fixed blade provides a fast reference for 90-degree joints on large flat workbenches.
- Woodworking and joinery: Carpenters mark exact cut lines across timber with a try square. They also use the combination square to transfer mortise and tenon dimensions consistently across multiple wooden pieces.
- Dimensional checking: Inspectors check the squareness of machined blocks with a try square. They use the combination square to verify hole depths and edge distances during strict quality control checks.
- Angle and depth marking: Fabricators set the sliding head to mark repeating 45-degree cuts on flat bar stock. They slide the blade down to measure blind hole depths precisely before drilling.
Accuracy and Measurement Considerations
Tool accuracy depends heavily on the manufacturing quality and basic construction. A poor-quality try square might not be a true 90 degrees out of the box. A high-end combination square can hold extremely tight tolerances. You need to look at the blade straightness and the squareness of the machined head. In a combination square, the locking mechanism must hold the blade perfectly parallel to the machined slot. Any wear in the lock will throw off your measurements. You must check your tools before critical measurements. You can draw a line on a flat surface plate, flip the square over, and draw a second line right next to the first. If the lines diverge, the tool is not square. The fixed nature of a try square means fewer parts can wear out over time. The adjustable sliding head introduces moving parts that require regular cleaning and inspection. The actual accuracy depends on the condition of the tool in your hand.
Selecting the Right Square for Different Requirements
The selection depends on the tasks you do most often in your shop. The combination square handles multiple layout functions. You can adjust measurements, mark 45-degree lines, and gauge depth. Adding different heads allows you to find the centre of round stock easily. It does the work of several tools in one package. A try square gives you dedicated 90-degree checking. The fixed reference is preferred when you need a rigid tool for rapid perpendicular marking. You just pick it up and use it without checking the lock nut first. Many shops keep both tools on the bench. You can use the try square for fast joint checks and rely on the combination square for complex layout work. Different layout requirements often mean you need the fixed rigidity of one tool and the flexible adjustability of the other for your daily production.
Key Factors When Selecting a Combination Square
- Blade material and finish: Stainless steel blades resist rust in damp shop environments. Satin chrome finishes reduce glare under bright shop lights so you can read the small markings easily.
- Accuracy: The head must sit perfectly square to the blade. Good tools use hardened steel surfaces to maintain this precision after years of constant sliding adjustments.
- Head construction: Cast iron or forged steel heads offer better durability than cast aluminium. Heavier heads stay stable against the edge of your workpiece during heavy marking.
- Locking mechanism: The lock must tighten firmly without applying excessive force. A brass locking bolt prevents damage to the steel blade slot and holds measurement settings securely.
- Graduations/readability: Deeply etched markings last longer than printed ones. You need clear metric and imperial scales depending on the exact measurement system your shop mostly uses.
- Available functions or additional heads: You can expand the tool by adding protractor and centre heads. Buying a complete set provides all these layout options immediately on the bench.
- Intended application: Heavy industrial work needs thick blades and robust heads. Light layout tasks might only require a smaller tool that fits comfortably in a standard apron pocket.
Conclusion
The choice between a try square and a combination square depends on function and measurement requirements. The try square provides a reliable fixed 90-degree reference. It gives you fast and rigid marking capabilities for repetitive work. The combination square offers high versatility on the bench. The sliding blade handles depth checks, angle marking, and offset measurements without needing extra tools. Neither tool is universally better than the other. The application dictates the specific requirement. A busy fabrication shop benefits from having both tools available on the floor. Understanding your specific layout tasks helps you pick the right square for the job at hand.


